Friday, 28 October 2011

Colouring image with reds and polychromos pencils Picture Tutorial

Picture tutorial for Colouring with reds and Polychromos pencils

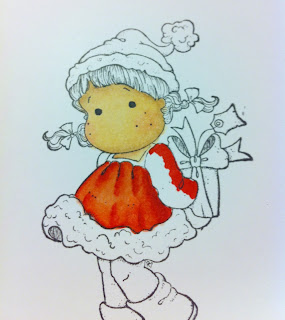
The image i am using is one of the new christmas magnolia images she is very cute and just calling to be coloured ~I decided to colour her red as I know this is one of the hardest colours to colour and blend.
I will start by colouring the skin I used E13, E11 E00 (not E31 as in pic derr)

I chose where my light sorce was coming from which is the right hand side but it is totally up to you.

the first colour I used is E13 


I then added E11 and blended it with E13

I then added E00 and blended all over


I added R20 to the cheeks


Then reblended with E00


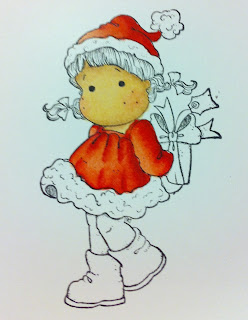
For the red dress I used R29, R22, R20 I find this the best combo for christmassy colour's

Using R29 first I added the darkest colour to the right side of her dress and to the folds
 I then blended with R22 then R20, I go over this a couple of time to get the blend I am happy with.

I have done the same for the sleeve and the rest of the dress

I used the same blending colours on the hat and neckline


 For the legs and hands I used the same skin combo as the face.


For the boots I used  C00, C1, C3, C5

Starting with the darkest C5 colour first 
The blending in the other greys

 For the ribbon I used the same copics as the Dress


For the Hair I used copics E18, E17 YR21


Starting with the darkest colour add to where you think is likely to be the darkest areas in the folds of the hair 

The add the other colours med then the lighest colours repeat to get the blend how you want it, it doesnt matter how many times you go over it will blend better the more you add colour.

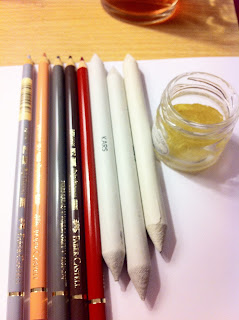
 I have now finished with the copics and want to add so me blending for more depth with polychromos pencils and sansador the colours I used are Dark Red, Walnut Brown, Warm Grey V, Cold Grey II and cinnamon.

 I used the dark red to add depth to the folds 

 Sleeves
 Using the dark brown I added it to the hair in the folds

 Then blended with a blending stump

 The cinnamon I used just under the hairline

 and the jaw line

again blending it with the stump

 do the same on the hands and legs


 now the warm grey V on the boots

 to the darkest areas


 Then blend it with a stump and sansador


 the cool grey II is used on the folds of the fir

 blend them to finish

 and R20, R22 to finish the parcel
and there you go the finished image I will make a card with the image and post it here to. Hope you enjoyed this  tut and it helps in showing  how to colour reds.

 

Friday, 14 October 2011

How I layout a card


I wanted to show you how I made this card once I had coloured the image.
The image I used is the fab and gorg Hazel and Nutty from Sugar nellie.
I haven't sorted out video cam yet so this will be a pic tut so hope you are ok to follow.


So this is the image I colored i ill add copic colors later she is very cute.

So once I have coloured the image I find various papers that will co-ordinate with the colours in the image
I picked 3 magnolia papers and a matching cor-dinations whitewash paper, I wont use all of the 3 papers but just wanted a choice anyone of these papers will go with the image as  the tones are all similar.


With the cor-dinations as my base matt layer I cut out leaving a white boarder showing on the blank card.

I picked the magnolia Design paper that had some little pink flowers on it and cut it out again leaving a boarder showing on the white wash paper.


Using a distressing tool distress all the sides of the papers and add little rips in the Design paper 


When you are going to sew on your paper remember not to put any double sided tape around the outside of your card that you are going to stitch as this will get stuck to your sewing machine needle, and yes I have done it lol. I used dark green cotton for this card.


Once you have sewn around your DP then you can add it to you your card base.


For the image I used some deckle scissors 

I then added the white wash underneath and then distress that as well.
I then sowed around the image and the whitewash cardstock.

so now onto the embellies I made two tiny tags out of this piece of whitewash card I cute it in half
and trimmed the edges then distress them


I then added a green pearl brad to each sorry pic not very clear.


Here is a selection of the punches and dies I have selected for this card.
the ribbon
I distressed the leaves and tag with some fine sandpaper.

I added the lace 


I put some foam tape on the back to the image to raise it up then added it to card base.

then I added my leaves
then the flowers I cut off the wires from the flowers but don't throw them away you will need them.
continue to add your flowers to the top left hand corner

I then added a lace corner to the bottom right.

I continued to add my em-bellies a flower and some wired gems.

add the tiny tags
I added a dragon fly on a small chain to the top left

wrap the green wire you took the stem of the flowers and wrap them around a picky tool 

then add them to the flowers I find it easier this way rather than leaving them attatched


to finish off I added a lovely big pink bow 
and there you go, I didn't use the tag in the end as there was no room to be honest didn't was to overload the card.